 The first bags I made I actually re-made from my own front
panniers. I pulled them apart, and re-made them to Ken Kifer's
specifications. It was easier making the other two sets from scratch!
I may never try that again.
The first bags I made I actually re-made from my own front
panniers. I pulled them apart, and re-made them to Ken Kifer's
specifications. It was easier making the other two sets from scratch!
I may never try that again.
I started seriously planning this trip during the summer of '02. I have several backpacking books, including some cookbooks, and several books on planning bike trips. I wasn't sure if we were going to plan our own route, or use our mapping programs to plan our own. We wanted to go to Yellowstone, and we wanted to visit Ric's brother in Bend, Oregon because we haven't been there, but beyond that, I wasn't sure just what to do. Using the mapping programs turned out to be much more difficult than I expected. I started out picking out two points I wanted to bicycle between, and then zoomed in on the detail of the maps to pick out what I thought were reasonable waypoints to bicycle through on the way from point A to point B. The mapping program then nicely routed me from Point A to Point B, AND THEN to the waypoints I picked out in the middle. I think the 60 or so mile stretch between Portland, Oregon and Astoria turned into about a 200 mile trip with one click of the mouse. I tried again, at least a few more evenings, but never could figure out how to do it without printing out the maps and doing it manually, which didn't make any sense. So, early on, I decided that the maps from Adventure Cycling were the way to go. Once I checked out THEIR maps, it became obvious that the Trans-America trail went close enough to Bend to cover that aspect of the trip. Recent Adventure Cycling magazines however, have been extolling their excitement over the new Lewis and Clark trail, for which maps became available in October of 2002. It was attractive for three reasons:
We still haven't quite figured out which way we're going to pick up the Lewis and Clark trail after Yellowstone, but we'll have both sets of maps for that part of the trip, and it shouldn't be bad. I'm inclined to head Northwest to Missoula, and then Northeast to Great Falls, since the largest Lewis and Clark Museum is in Great Falls, but I can easily imagine being outvoted if it takes longer than expected to arrive at Yellowstone. So that part of the trip isn't set in stone yet. Wherever we pick up the Lewis and Clark trail, we'll be following it to the end, and then on to St. Louis ( a short diversion - can't miss the ARCH!). Then, Hannah and I will be doing east of the Mississippi in the last part of the trip. By then, we're expecting muscles to get over the Alleghenies, which, contrary to intuition, are considered more difficult to get over than the Rockies. We'll let you know about that.
So, the mapping turned out to be fairly easy. I bought both sets of maps from Adventure Cycling.
The first bags I made I actually re-made from my own front
panniers. I pulled them apart, and re-made them to Ken Kifer's
specifications. It was easier making the other two sets from scratch!
I may never try that again.
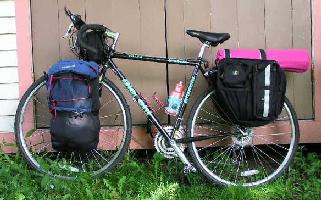
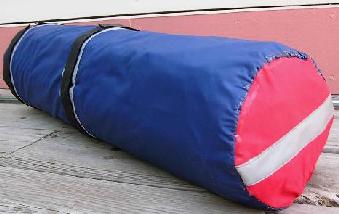 I also decided that adding my large (and
heavy) sleeping pad would require putting it on top of the rear rack
instead of in a pouch on the lightweight pannier, so I did that with
my pad and Hannah's, making stuff sacks out of waterproof nylon, and
adding velcro to velcro them to the bikes without interfering with the
pannier hooks. I'm somewhat worried about the velcro pulling the
fabric apart and thereby destroying all my work at waterproofing them,
but I can cross that bridge if I come to it with some sheet plastic.
And, I've managed to keep the center of gravity of the load much lower
than how I've seen most touring bikes loaded. The bikes handle well
loaded, so I'm happy with the results. Hannah didn't even have much
problem getting used to riding with hers. Of course, we haven't
loaded them fully until the food and fuel gets packed, and we haven't
done that yet.
I also decided that adding my large (and
heavy) sleeping pad would require putting it on top of the rear rack
instead of in a pouch on the lightweight pannier, so I did that with
my pad and Hannah's, making stuff sacks out of waterproof nylon, and
adding velcro to velcro them to the bikes without interfering with the
pannier hooks. I'm somewhat worried about the velcro pulling the
fabric apart and thereby destroying all my work at waterproofing them,
but I can cross that bridge if I come to it with some sheet plastic.
And, I've managed to keep the center of gravity of the load much lower
than how I've seen most touring bikes loaded. The bikes handle well
loaded, so I'm happy with the results. Hannah didn't even have much
problem getting used to riding with hers. Of course, we haven't
loaded them fully until the food and fuel gets packed, and we haven't
done that yet.
|
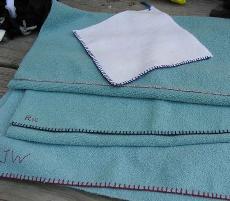
I made a lot of the equipment for the trip, besides the panniers. Here's
some of it:
stuff sack for rain capes |
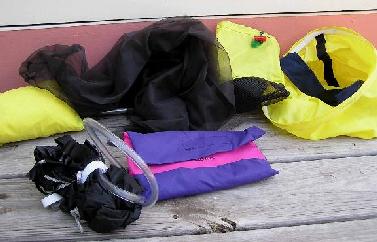 |
| Some of the stuff we bought needed some color coding to prevent mix-ups: |
|
Ric had a biking poncho he especially liked on his trip almost 30 years ago. When he dragged it out of the basement, it was more than a little moldy. Yech! (Who saves that stuff for 30 years anyway?) I tossed it in the washer, (which destroyed it's waterproof coating - no great loss), and then proceeded to cut it up as a pattern for three biking rain ponchos. They're similar to the ones they sell at Adventure Biking for a lot more money, but it goes down farther in the back, and does have a hood. Hannah's reaction to being asked to try on her poncho was "OK, mom, duck-i-tize me!" Yes, they're yellow.
Everything I made that's on the outside of the bikes has some reflective fabric or tape on it SOMEWHERE, including the rain ponchos. I figure if I'm going to drag a 13 year old along on the ride this long, I shouldn't make it easy for her to be hit by a motorist who didn't see her in bad weather. Even though we have no plans to bike after dark, rainy days can be pretty dark. I'm expecting some short days in the Appalachians because of morning fog as well.
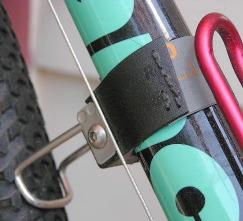 Hannah and I had some trouble with the "flick-stand." A "flick-stand" is
something that fits on the down tube that flicks up to stiffen the
front wheel in line with the rest of the bike to park it. It's used
in lieu of a kick stand. I've had one on my mountain bike and my road
bike for years, and can't live without it. We just assumed that we'd
get some for the trip. However, as fate would have it, it wasn't as
popular with the rest of the world, and it's no longer made. Ric
dragged his off his old touring bike, but quickly discovered that his
and Hannah's down-tubes were much wider then mine, so it didn't fit.
Hannah and I had some trouble with the "flick-stand." A "flick-stand" is
something that fits on the down tube that flicks up to stiffen the
front wheel in line with the rest of the bike to park it. It's used
in lieu of a kick stand. I've had one on my mountain bike and my road
bike for years, and can't live without it. We just assumed that we'd
get some for the trip. However, as fate would have it, it wasn't as
popular with the rest of the world, and it's no longer made. Ric
dragged his off his old touring bike, but quickly discovered that his
and Hannah's down-tubes were much wider then mine, so it didn't fit.
I just set it aside, figuring that when I got a few minutes, I'd add some fabric or other filler to enlarge the diameter of the piece that went around the down tube. I got some time finally, carefully cut the exact length I needed to enlarge it, drilled some itty bitty holes in both ends, with matching holes in the extra piece, and proceeded to sew the ends together with some waxed thread. It was a fifteen minute job.
Then I said to Hannah, "Let's just wait until your dad notices. If it's an engineering job that requires sewing, he won't be able to figure it out."
Sure enough, the next night at dinner, he saw the flick stand. His comment was "How did you get that on there, did you just leave the ends open?"
Instead of answering him, I said to Hannah, "See, what did I tell you. He wouldn't have a clue. . . . I sewed an extra piece in the middle."
It was fun to outsmart an engineer for once. . .
While I'm at it, I might as well put up my recipe for wheat-free granola. It's not rocket science. I just grabbed whatever there was in the health food store that wasn't wheat. The binding recipe was in a packpacking book.
1/2 lb. barley flakes
1/2 lb. triticale flakes
1 - 1 1/2 lb rolled oats
1 cup of almonds, slivered or food processed, so they're not whole
1 cup of sunflower seeds
Binder:
1/3 cup canola oil
a good squirt of honey
rest of full cup maple syrup - grade B if you can get it. You can! (Please, no substitutes
for the real stuff)
Mix the dry and wet ingredients. If it's too wet, add some more oats. You want everything just damp.
Toss in over for a couple of hours at 200. Stir after about an hour, and watch it carefully after an hour and a half. It should be dry, but not cooked.
Add currents and raisins, or your favorite dried fruits. Package for trip. Note that with oats, it is NOT suitable for celiacs.
This makes a generous amount, and it's what fits in my pan. Obviously, you can make less or more. I'm planning on putting one full recipe in each resupply box. We'll eat eggs for breakfast other days to make sure we get a lot of protein.
Last updated 2003 June 14.